|
|
AnimationIn 1873, ex-California governor,
Leland Stanford had a racehorse he loved named Occident, he wanted to
show the world his horse in action, so hired Edweard Muybridge to photograph
his trotter, with a high speed camera shutter he was developing. After much testing, Muybridge
rigged up a battery of 12 cameras with strings attached to the shutters
then let the horse trip the shutters by breaking the strings as he ran
through them. The results showed the world something they had never seen
before, a horse indeed did have all 4 hooves off the ground, but curled
under its belly rather than in hobbyhorse style as previously depicted
by painters and artists of the time. Drawings of the photographs
were printed in Scientific American and readers were urged to paste and
view the successive pictures in a spinning drum toy with slit called a
zoetrope which allowed to view the still images in such quick succession
that they merge in the mind to produce the illusion of motion. This led to a series of motion studies of animals, men and women. It wasn¹t until 1880 when Muybridge used a zoopraxiscope to project them on a screen at the CA School of Fine Arts in San Francisco that people could see these still images become reborn as motion pictures. Today we use the same priciples when creating GIF animations for the web. A sequence of images reveals itself one after another, flip-book style. |
|
| GIF Animations - Layer visibility revealed | |
| Using layer visibility to create an animation is very simple, and allows you to save an animation-building file in Photoshop format (.psd) for later re-editing. | |
|
|
A Photoshop file (.psd) with different layers can be opened or created in ImageReady to prepare a GIF animation. GIFanimations downloaded from the web can also opened in ImageReady and 'deconstructed' into their separate frames/layers.When creating an animation in ImageReady, make sure that elements that are to be animated are placed on separate layers.ImageReady treats layers as individual elements in an animation. In this example, each layer contains a slightly different still image over a period of time to create a sequence of motion or events.You can draw or paint on any distinct layer as long as it is the top most visible layer and the Paintbrush icon has been triggered or 'turned on' by selecting or clicking on the layer. |
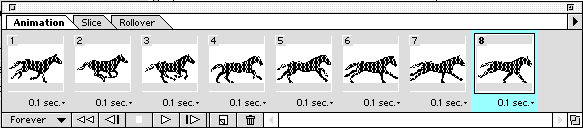
| Animation palette | |
Use the Animation palette to add new frames, update existing frames, and preview the animation.
Repeat until you have created your masterpiece. |
The animation palette (Window menu-> Show Animation)
Choose the duration of time (in seconds) from the Frame delay pop-up directly underneath each image.Choose the Looping options (Once, Forever) from the pop-up at the bottom of Animation palette.'Play' the animation with controls to check your progress. |
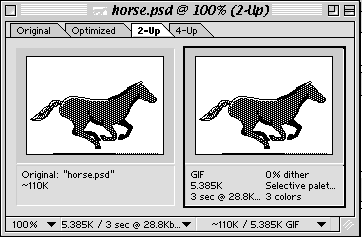
| Side by side comparison and saving the smallest sized file | |
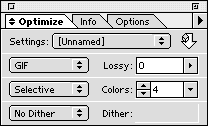
By decreasing the number of
colors, you can shrink the file size of your GIF animation for quicker
loading on a web page.
|
|
| Assignment: Create a GIF animation to 'sell or tell' under 100k | |
Combine text and images to create an 'advertising' banner to sell an imaginary product, tell a short story, or promote an inspiring idea.Animation dimensions = 468 pixels in width by 60 pixels in heightFile size = 100K (maximum)These are due next week at the end of your class! |
|
|
|
|