Recording Your Voice-over
Script
|
SoundEdit 16 By now you have crafted a fine
and compelling story to tell and the task of recording your voice looms
large. |
|
|
The Windows SoundEdit 16 is an audio capture tool. You'll use it to record your voice into several clips. The timeline or capture window will display a representation of your voice in wave format once you have recorded a segment of your script. The Controls window is extremely simple to operate. Click the Red button to record and the Square Black button to stop recording. The Play button or your spacebar will PLAY the clip. |
|
|
|
|
|
Choose the appropriate microphone setting from the Control Strip. The small slot mic located at the top of the iMac box is the Built-in mic. If you plug in a microphone into the side bay, then you are using an External Mic. |
 |
|
|
|
|
Audio is measured by the bit depth that is assigned to each second of audio. The higher the bit depth (8, 16, 24) the better the audio, the larger the file. Audio is also calibrated by the dynamic range of info recorded, from low (11kHz) to high (44 kHz) The Sound Format window is accessible from the Modify menu. For the best quality, record your voice at 44 kHz and 16 bits. |
|
|
|
|
|
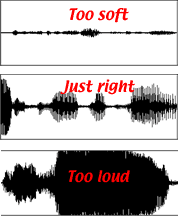
Its very important to your movie that the audio is of great quality. You need to test record then listen/replay to be sure you have captured the best version of your recorded voice. You can also see if your voice is too quiet or too loud (which causes distortion) by looking at the waveform in SoundEdit's display window. Adjust the strength of your voice or your distance from the microphone to create the best balance. The spacebar will PLAY the clip to hear the results. |
 |
|
|
|
|
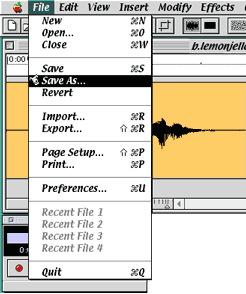
Each chunk of
your story should be
saved as a separate file with an alphabetical AND clue naming convention.
Save them all directly into your Voiceover ƒolder on your computer.
Once your recorded clip has been saved, you can select and delete it or record over it to replace the previous recording with the next segment of your script.
|
 |
|
|
|
|
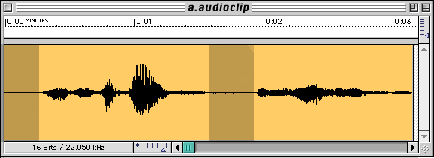
You can copy, cut and paste just like a word processor to make simple edits. The 'dead air' represented
by the flat line portion of the audioclip can be selected and cut
or deleted as you would in a text document. This would close the
gap between the words spoken. |
 |
|
|
|
|
3 special effects Echo… will create an echo effect, you can choose the 'time-delay' of the echo Pitch Shift… will change the pitch. Your voice can sound deeper and slower, or higher and faster. Tempo… will change the speed of your clip. Your voice can sound slower or faster. The spacebar will PLAY the clip to hear the results. and 1 for fun… |
 |
|
If you haven't
submitted your script by sending an email to techno09teacher@mac.com.
you are woefully behind in your work... |
|
.