File management: File folders and Photoshop preparation • Scanning • Sizing • [ Horzontals • Verticals ]
Creating your Moov ƒolder and the ƒolders insideAs you begin to gather your
images and create your voiceover files for your movie masterpiece, |
|
|
|
Your Moov ƒolder Create a new ƒolder
inside your personal ƒolder in the Techno.09 ƒolder. Inside this ƒolder, create 6 new ƒolders named: Projects Voiceover Soundtrack Originals SizedImages Titles
|
|
|
|
|
If you have photographs, drawings or magazine images to be scanned…
|
|
|
|
|
Sizing your images in PhotoshopYour images should
all conform to a 4:3 aspect ratio, 640x480 or 320x240 [pixels]
depending on your source materials. Set the crop tool options as you have done so many times before... They should all
be Saved As… the same file type: PICT or Photoshop |
|
|
|
|
|
|
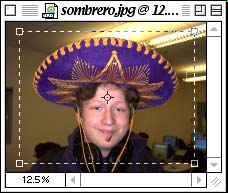
Sizing horizontal images Once you have scanned and transferred all your images, Open Photoshop at your computer Choose our old friend the Crop
tool from the Photoshop Tool palette.
Check the Fixed Target Size
box Marquee the area you want to include and double-click inside to crop to the fixed size. Save As…the image to your Sized Images ƒolder as "distinctivefilename640" |
|
|
|
|
|
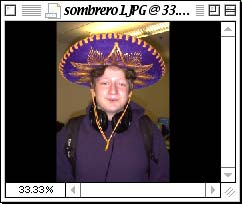
Sizing vertical images A image that is taller than it is wide needs another step when sized to reach the desired4:3 aspect ratio. A vertical image placed on a black background will fill out the dimensions you have chosen to work with. Choose the Crop tool and set the Height to 480 pixels, leave the Width blank and Crop the image to include the area you want to keep.
With the background color
set to black, Choose Canvas Size… from the Image menu.
Save As…the image to your Sized Images ƒolder as "distinctivefilename640" |
 |
 |
|
Any questions will be answered: send an email to techno09teacher@mac.com. |
|
>>