
3 brief steps describing the way to make a cermanic pot on the wheel, and idea's and hints.
1 |
|
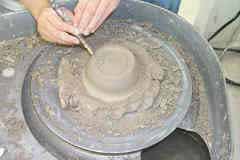
Pound a clump of clay into a ball, make sure you get out all of the air bubbles. Otherwise it will ruin the pot and it will blow up in the oven. Put the ball of clay on the center of the wheel. Turn on the wheel. Try and center the clay with your hands. It is centered once it stops wobbling. Good luck! Then with your hands in this position: dig in the middle of the clay with your thumbs. Once you think that you are far enough down, stop the wheel and get a needle tool and measure how much clay is left in the bottom of your pot. You want to make sure there is at least a half inch, otherwise the bottom is too thin. Then you pull of the walls of the clay with your fingers, slowly, and don't make them too thin. It will collapse if it's too thin. When your done, stop the wheel, and with a string tool, or a spatchela type too, scoop it up and but it on a board of some sort. Voila! Your pot is done, so far. |
2 |
 |
To trim your bowl your have to leave out the bowl until it's stiff. Then, you turn it upside down, and put it on the wheel with the bottom facing the wheel. Then you put some pieces of clay around your bowl to clamp it down. Make sure it is clamped down well, otherwise it will go flying when you turn the wheel on. (Been there, done that). Then with one of those weird tools, scrape off the weird lumpy parts on the bottom to make it smooth. CAUTION: remember how much clay is at the bottom, you don't want to go through the bottom and ruin the pot. Once you are happy w/ the results you can start painting. You are done with this step! |
3 |
|
Now you paint your trimmed pot however you want. Make it creative, you can use splatter paint, and you can melt glass in the bottom of the bowl (just put a piece of glass inside of your bowl, and in the kiln, or you can just paint it. If you want, you can add on shapes and designs on the pot.
You need to use underglaze paint, (or if you want, you fire your bowl after it has been trimmed and then you paint it with over glaze)
Now you fire your pot in the kiln. When this is done your pot is done, or you can put a clear over glaze to make it safe to eat, and make it last longer. You do not want a thick layer of over glaze, or it will break. Fire your pot again for the last step. |


