Your camera grab may be too large for your web page or print job. Re-sizing the image is a simple, yet powerful manipulation in any graphics application.
1 | Get the specs! |
|
Just as a mattress tag stays attached in case you need the information, most graphics programs have their own "mattress tag" with pertinent information about each image. In Photoshop, the information can be viewed by holding down the Option/Alt key to reveal a pop-up from the Doc: box on your image's window. The width and height will tell you the dimensions, while the resolution describes the number of pixels per inch. There are 72 pixels to a visual inch on most computer screens. Viewing the images at 100% will give you a WYSIWYG estimate of how it will display on the web. | ||
2 | By the numbers |
|
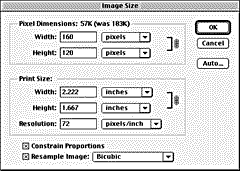
You can adjust the Image Size (under the Image menu in Photoshop)
and type in your preferred size, numerically. So the image doesn't distort
in one direction or the other), simply check the Constrain Proportions
checkbox and let Photoshop do the math. This dialog box will also allow
you to adjust for print size and change resolution, numerically. Consider
the final destination--printing (300 or more pixels/inch (dpi) or the
Web (72 pixels/inch)--when making your decisons.
Note: You can't add missing information to your image. If your image was captured at 72dpi, changing the resolution to 300dpi for printing won't make your picture sharper unless you also reduce the size proportionally. For example, a 1 inch square picture at 300dpi is equivalent to a 4.167 inch square picture at 72dpi. | ||
3 | Crop it |
|
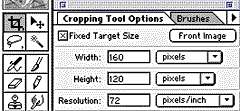
You can visually crop to size with Photoshop's cropping tool. Check the
Fixed Target Size checkbox on the Tool Options Palette and type in your
preferred width, height, and resolution. Use the Cropping tool to marquee
the area of your image to be included. You can make some rotational
and size tweaks before you double-click inside the borders to shrink it
to its desired size and resolution. |